|
Hints Tips & Rants
by Dale Atchison Tampa Bay Computer Society |
Monthly Maintenance
Here's a long-overdue update to my nearly-famous monthly maintenance routine. A couple of changes:
[Late note: After I posted the zipfile, I continued experimenting, editing, etc., and realized the batch file also wipes the Service Pack Uninstall folders. ...But if Service Pack 3 loads despite your best efforts, you're gonna need the Uninstall folder when your computer slows to a crawl. I've updated the batch file now, so if you downloaded "Monthly Maintenance.zip" before Friday the 12th of February, you should download it again. Sorry, my bad. — DaLe, your terribly embarrassed editor.]
Let's get started:
If you're running a 32-bit version of Windows, that's it; skip the next section.
At this point, whether you're running XP, Vista, or "7", 32- or 64-bit, the process is the same: once a month, open the Monthly Maintenance folder, open INSTRUCTIONS.TXT, and follow the numbered steps to keep your computer running at its maximum possible speed.
The first time you open the instruction file, click on Format, and put a check mark next to Word Wrap — this makes reading the file a lot easier.
There are two sets of instructions in the file. Use the "BRIEF" set at the top once you've gone thru the process a few times and are familiar with the steps; the "VERBOSE" set tells you every little thing to do — hopefully, you'll only need to use this set a couple of times. And once you're comfortable with the whole routine, you can edit the INSTRUCTIONS file, wiping the "VERBOSE" section altogether.
Tips.Net
Microsoft Excel Tip: Relative Worksheet References when Copying
When you copy a formula from one cell to another, Excel automatically updates any relative references within the formula based on the target that is receiving the formula. For instance, assume that cell B7 contains the following formula:
If you copy this formula to cell D22, Excel automatically updates the references so they are relative to cell D22, as shown here:
When you are copying formulas from one worksheet to another, and the formula contains a reference to a previous worksheet, Excel doesn't do this type of formula updating — at least not on the worksheet names. For instance, let's say you have three worksheets named January, February, and March — in that order. On the February worksheet, you have the following formula:
If you copy this cell to the March worksheet, Excel will automatically change the B7 reference (if necessary), but it won't change the sheet name (January, which was "one less" than the sheet on which the formula first occurred) to the adjusted relative sheet name (February, which is "one less" than the sheet to which the formula is being copied).
If you have only a few worksheet references in your copied formulas, it is fairly easy to just edit the formulas so they reference the proper worksheet. The task can quickly become a nightmare, however, if you have dozens or hundreds of such references.
Notice in steps 4 and 5 that what you are searching for and replacing it with is not the straight month names. This is done because the month names alone (January, February, etc.) could easily occur in other places in the worksheet without being part of a formula. You don't want to change these instances, so the extra characters are included to help narrow down the search.
Copyright © 2009 by Sharon Parq Associates, Inc. Reprinted by permission. Word includes a feature, by default, that tries to make your editing chores just a little easier. This feature, called smart cut and paste, adds or removes spaces when you are cutting or pasting text. This may sound odd, but it is really helpful in many situations. For instance, if you are pasting a word into a sentence, smart cut and paste makes sure that spaces are added around the word so that it doesn't "run in" to the words you are pasting near. Likewise, when you cut a word from a sentence, sometimes the cut might result in two spaces left: the ones that used to surround the word being pulled. Instead, smart cut and paste results in one of the spaces being automatically deleted, so the resulting sentence has (at least) the proper number of spaces in it.
The Monthly Maintenance folders below will work "as-is" with the 32-bit versions of Windows XP, Vista, and Windows 7; there will be additional setup instructions below for those with 64-bit versions of Windows. If you'd like to use this cleanup method on a Windows 98 or Millenium Edition computer, click here , tell me about it, and I'll send you the files for older versions of Windows, plus instructions; if there are more than two or three such requests (FAT CHANCE!), I'll publish a Win9x version of this topic next month.
First, you'll need to download and install these two free utilities:
Next, you'll need to download this zip file to your desktop; it contains a Monthly Maintenance folder for Windows XP, Vista, and "7". Right-click the zipfile » Extract All » Extract; once you've verified the folder extracted properly — you should find yourself in the extracted folder — close the folder, then delete the zip file.

EasyCleaner 2.0

Smart Defrag

Monthly
Maintenance
If you're running a 64-bit Windows edition, the EasyCleaner and SmartDefrag shortcuts won't work; the shortcuts point to sub-folders of "C:\Program Files," but the programs are installed to sub-folders of "C:\Program Files x86," where all 32-bit programs live in 64-bit Windows. The fix — even if it's a little long-winded — is a lot simpler than the explanation:
=B6+A7 =D21+C22 =January!B7*1.075
The solution is to do a simple search-and-replace operation in Excel, as outlined here:
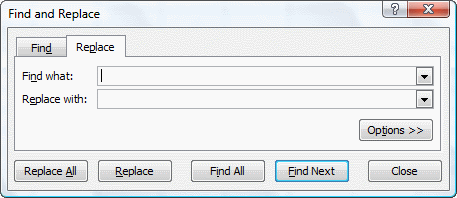
The Replace tab of the Find and Replace dialog box.
The formulas in the worksheet are now updated so they refer to the proper worksheet.
Thousands of free Microsoft Excel tips can be found online at excel.tips.net
Microsoft Word Tip: Understanding Smart Cut and Paste
You can control smart cut and paste in the following manner if you are using Word 2007:
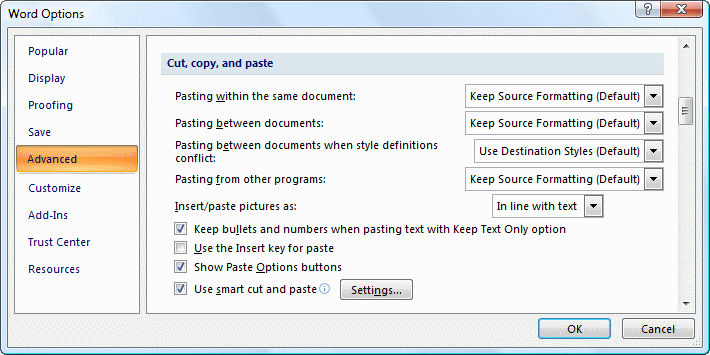
The advanced options of the Word Options dialog box.
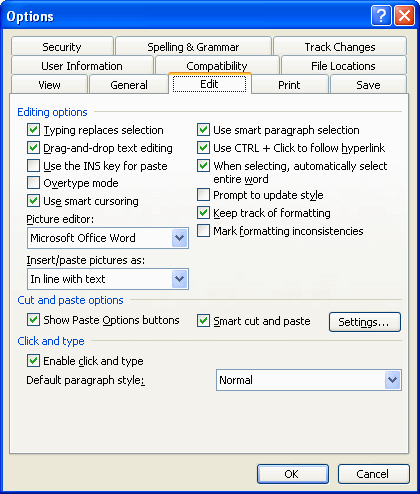
If you are using an older version of Word, control the smart cut and paste feature in this manner:
Thousands of free Microsoft Word tips can be found online at word.tips.net .
Website Woes
This topic is based on an email I got from a client, so it might have appeared in a Quandaries column. But I can't fix it, and I believe it's worthy of a Rant, so here's the email and my response:
Hello Dale,
Because the MyFamily.com website changed servers, I lost almost half of the 1000 photos, with family heritage information, I had stored there: ten years of hard work; they said it was because the new servers found viruses in my work as the files were being moved.
I think they should have told us beforehand what they were going to do, so we could have saved our work. I feel they are responsible for the loss. A weak apology is all they have to offer.
What do you think? This completely sucks. If their filters didn't reveal problems with your files at the time you uploaded them, it's 'way inappropriate for them to wipe your stuff without warning now.
And there's a big question regarding whether the files were really infected; JPG files can't contain viruses, but they can contain code waiting to be executed by an infected 'sleeper' or Trojan.
And I agree with you that the website should be liable for your loss. They should have sent you a warning about the move, advising you to make local copies of all your stuff. And they should have COPIED your files, instead of MOVING them, just in case of this sort of error.
Now, having said all that, I have to advise you to read the agreement between the website and yourself; I'm willing to bet they agreed only to provide hosting service, and specifically exempted themselves from liability over loss or damage... even if it was clearly their fault!
I gotta ask: you really had files on the website that weren't also saved on your hard drive? Or on any of your family's hard drives? I have at least one local copy of everything I've ever posted. Doesn't help you now, but keep it in mind when you set up your new site...
...Because you have to move the site, or you're acquiescing, condoning and agreeing to what they've done. And you can't even ask for a refund — they did what they promised: they provided a convenient place to post your files... right up to the point where they lost your stuff.
Till next month...
DaLe aTchiSon